 |
I recently added a Work Sharp 3000 to my sharpening kit so I thought I'd share my initial experiences with it. I've had it for a week or so and have run it through the paces enough to be able to speak to its strengths and weaknesses. I also picked up the wide blade attachment at the same time, I'll share my thoughts on that after I get more time with it.
First and foremost the kit comes with everything you need to get started out of the box, setup instructions were clear, easy to use and got me up and running in less than 10 minutes. After getting it spinning I watched the DVD that came with it and again they did a fairly decent job. It's good quality video (not an iPhone 2 on YouTube), gets to the point quickly and goes through all the basics of using it. I spent maybe 30 minutes of time on setup, configuration and watching the DVD and I was on to sharpening.
Setup
I applied my paper using their recommendations, wheel 1 has 100 and 400 grits on it, wheel 2 has 1000 and 3600 on it. The hardest part there is getting the backing off the paper, perhaps someone with fingernails would have a better time. It was actually a frustrating experience for me but I figured it out.
You then adjust the angle on the sharpening port you desire, in my first test 25 degrees and set the fence to the tool width. All in all, 60 seconds max.
Finally attach the wheel with the desired grit pair, face the lowest grit side up so you can stet on flattening the face.
The first tool I sharpened was an old garage sale chisel, a 1/2" Craftsman one and even for my first one I went from dull old junk to scalpel sharp in less than 30 minutes. And that includes cleaning up the face as I sharpened. From 0 to a sharp tool took an hour, far less than my sandpaper/granite and diamond/wet
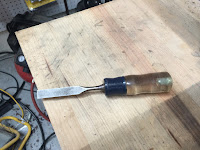 stones, like 1/4 of the time. And that was just my first one!
At that point I went and found any tool that I thought needed sharpening: chisels and plane irons. After spending another few hours with it on several other tools I got the entire procedure down to less than 10 minutes. And that's for a really old, beat up, early 20th century Stanley no 3 plane iron. By the end of the day I had sharpened around 10 tools, mostly chisels but 2 plane irons as well.
It comes with locations to screw the unit to a jig, bench or the like but I'm not sure how well that would work out. When you exceed the width of the sharpening port on the front you need to move to the top of the unit to sharpen. The problem there is if it is screwed to your bench you'd need to somehow stand sideways to it so you can get to the top correctly. As a result I don't have it screwed down however it doesn't move around while you're sharpening which I thought it would. I bet the shorter height and decent rubber feet allow that. So, at least for now, it's not getting permanently mounted anywhere.
The 2" width limitation on the sharpening port is annoying, I really wish it would go up to the largest plane iron widths. Being able to do a no 8 using the port would be immensely handy. But... It's not that bad to switch to the top, especially with the wide blade attachment.
The Work Sharp 3000 uses common abrasives to sharpen, so common that I bought 5" orbital sanding discs from my local Menards and am using those now. You'll save some cash by using something like this instead of the Work Sharp brand abrasives. If you want the Worksharp brand coarse discs, they're not that bad either and are easily obtained from Amazon . You'll also get a larger selection of grits, basically whatever you can find. All you'll need to do is cut a hole in the center of the disc if it doesn't have one already so keep a sharp X-Acto hobby knife in your sharpening station. I put this as a con, the usage of abrasives that is, since over time this is what's going to pull money from your wallet. The real question is how long that period is before you're at the price of a Tormek. For me that's several years which I'm ok with.
Along the same vein are the micro-mesh abrasives they use at the higher grits, 3600 and 6000. I have been unable to find a suitable replacement disc at a lower cost than the Work Sharp brand replacement honing kit. I used up the 3600 one that came with my original set, though that was from a mistake in my initial sharpening technique. No matter, how it happened aside, replacement mico-mesh abrasives will run you around $14 for a new pack . And that's for just 2 discs in the kit, a 3600 and a 6000. On the flip side under normal conditions these should wear down slowly since they're just for honing.
I love their heat sink idea on the bottom of the sharpening port but in reality there are times you'll need to dunk the tool in water (or other) to keep it cool. This is highly dependent on how hard and for how long you push the tool into the port, I found that 1-2 medium pressure pushes keeps overheating to a minimum. Remember this is sandpaper spinning at high speed against steel, the stuff gets hot so keep a glass of water at your sharpening station.
There are still a couple bits I have not tested but hope to at some point. The first thing is the "see what you're doing" sharpening setup, I haven't tried it out yet. This is the rig that allows you to see through the top of the system at the tool as it's sharpened. It's supposed to allow you to readjust the tool on the fly as you follow the sharpening.
Second, I have not wear tested it over a period of time. I've had it a short while so only time will tell. If it stops working tomorrow I'll let you know.
For the price tag of $199 I must say, I have absolutely NO idea why I didn't buy one of these sooner. It worked out of the box, was super quick to setup and learn and for what it really does: make any tool razor (if not scalpel) sharp. Here's a link to get one for yourself on Amazon. While you're at it, pick up the wide blade attachment
 as well.
I have yet to find a tool that you truly can't sharpen on it. Gouges can be done on the top though it's probably not the best tool for sharpening these, that's what a Wolverine jig is for. And on that note, I'm off to the shop to build a mounting jig for my Wolverine...
Happy (sharp) shavings!
Getting to it
The first tool I sharpened was an old garage sale chisel, a 1/2" Craftsman one and even for my first one I went from dull old junk to scalpel sharp in less than 30 minutes. And that includes cleaning up the face as I sharpened. From 0 to a sharp tool took an hour, far less than my sandpaper/granite and diamond/wet
 stones, like 1/4 of the time. And that was just my first one!
At that point I went and found any tool that I thought needed sharpening: chisels and plane irons. After spending another few hours with it on several other tools I got the entire procedure down to less than 10 minutes. And that's for a really old, beat up, early 20th century Stanley no 3 plane iron. By the end of the day I had sharpened around 10 tools, mostly chisels but 2 plane irons as well.
Nothing is perfect...
It comes with locations to screw the unit to a jig, bench or the like but I'm not sure how well that would work out. When you exceed the width of the sharpening port on the front you need to move to the top of the unit to sharpen. The problem there is if it is screwed to your bench you'd need to somehow stand sideways to it so you can get to the top correctly. As a result I don't have it screwed down however it doesn't move around while you're sharpening which I thought it would. I bet the shorter height and decent rubber feet allow that. So, at least for now, it's not getting permanently mounted anywhere.
The 2" width limitation on the sharpening port is annoying, I really wish it would go up to the largest plane iron widths. Being able to do a no 8 using the port would be immensely handy. But... It's not that bad to switch to the top, especially with the wide blade attachment.
 |
| 5" Replacement discs |
. You'll also get a larger selection of grits, basically whatever you can find. All you'll need to do is cut a hole in the center of the disc if it doesn't have one already so keep a sharp X-Acto hobby knife in your sharpening station. I put this as a con, the usage of abrasives that is, since over time this is what's going to pull money from your wallet. The real question is how long that period is before you're at the price of a Tormek. For me that's several years which I'm ok with.Along the same vein are the micro-mesh abrasives they use at the higher grits, 3600 and 6000. I have been unable to find a suitable replacement disc at a lower cost than the Work Sharp brand replacement honing kit. I used up the 3600 one that came with my original set, though that was from a mistake in my initial sharpening technique. No matter, how it happened aside, replacement mico-mesh abrasives will run you around $14 for a new pack
. And that's for just 2 discs in the kit, a 3600 and a 6000. On the flip side under normal conditions these should wear down slowly since they're just for honing.I love their heat sink idea on the bottom of the sharpening port but in reality there are times you'll need to dunk the tool in water (or other) to keep it cool. This is highly dependent on how hard and for how long you push the tool into the port, I found that 1-2 medium pressure pushes keeps overheating to a minimum. Remember this is sandpaper spinning at high speed against steel, the stuff gets hot so keep a glass of water at your sharpening station.
Not tested
Second, I have not wear tested it over a period of time. I've had it a short while so only time will tell. If it stops working tomorrow I'll let you know.
In closing: go get one!
a link to get one for yourself on Amazon. While you're at it, pick up the wide blade attachment as well.I have yet to find a tool that you truly can't sharpen on it. Gouges can be done on the top though it's probably not the best tool for sharpening these, that's what a Wolverine jig is for. And on that note, I'm off to the shop to build a mounting jig for my Wolverine...
Happy (sharp) shavings!


